Thursday, December 9, 2021

Black, White & Red All Over

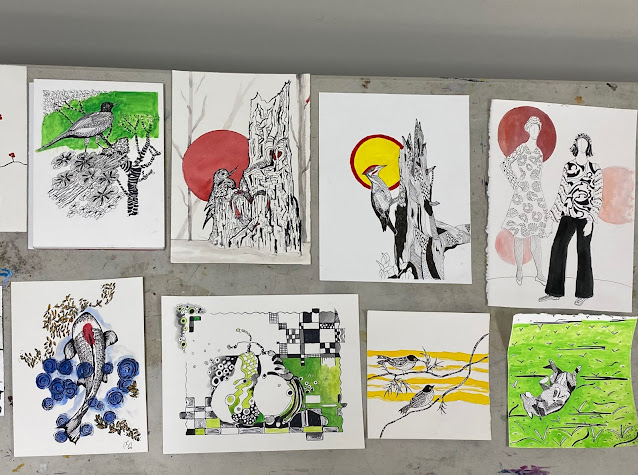
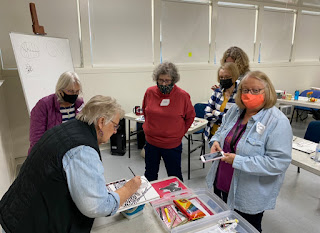
I love to share my art skills and teach others, so I was definitely in my element last week in Portland. The one-day class I taught (titled Black, White & Red All Over) was great fun filled with 11 enthusiastic participants. We were all there to spend the day drawing and making patterns to create art. I was delighted to see how everyone in the class took to this method of making art so easily. But why not? In our early years we all start drawing and doodling, although I do not choose to use the word "doodling" in my creations.

Class Work

Starting Shapes to Fill with Patterns
Making Patterns


Patterning on Subject Matter

Some Finished work

King of the Couch


                 A Different Subject Matter


I began this newer method of making art after the Holiday Farm Fire burned down our home over a year ago. I was drawing trees and inking in burned bark. As life began to return, I started adding plants and birds to my burned woods. 

But before my workshop, I thought I should try a different subject matter to encourage my class to look beyond what I do, and so I used our cat for the subject matter. I was happy to show how the same technique could be used in a variety of subject matters.


My Demonstration Piece


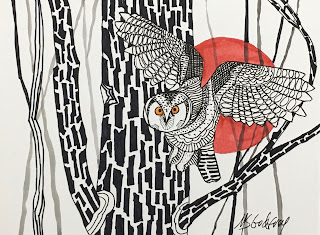
For my demo I returned to my burned forest theme with an owl as the center of interest. During the day, I worked on the piece between times of giving each participant some individual time to talk about their work and answer questions.

By the end of the day I had finished a painting featuring a lovely owl flying through the burned trees.


Suzy's Owl


One of the class members decided to purchase this guy in flight. I signed it and christened it "Suzy's Owl." He will find his way to Sun River!


Why Owls? 

I have been thinking about this lately. I have heard owls hooting through the night, but have rarely spotted one with my eyes. Yet they seem so lovely in my fire inspired art. 

"Owls represent wisdom, knowledge, change, transformation, intuitive development, and trusting the mystery. They are tied to the spiritual symbolism of “death” which brings about new beginnings with a higher understanding and evolved perspective. Owls can show up when you are being asked to listen to your intuition." Gleaned from the internet.

"Change, Death and New Beginnings" seem to apply to my life of the past 15 months. The Holiday Farm Fire brought a forced change, death to our home, landscape and plant-life, and New Beginnings as we forge ahead with a new home and regrowth of our beloved McKenzie Valley. 

Happy Holidays to one and all!

The Star of Hope


Wednesday, November 10, 2021

Left Brain/Right Brain: Art Needs Both

My good friend Ruth Armitage (https://rutharmitage.com/) recommended the book "Expressive Drawing" by Steven Aimone, so, of course I bought it. He talks briefly about the use of the left and right parts of your brain in drawing. I started thinking about my recent "fire inspired graphic art" pieces and how each side of the brain is used in creating these pieces.

I begin with an idea of shapes: trees, limbs, birds, leaves, owls. The left brain then takes the shapes and applies my knowledge of composition and arranges them on the paper. In this piece I was thinking of a circular connection for the owl and the vine maple. Do you see it?


After adding my charred tree shape, I switch to the right side of brain. I start filling in the shapes with line work that is not based on any reality. I allow myself to do something you might call doodling within the shapes. This is my own method of mark making. To me this changes the piece from drawing to art.


After all the mark making, I look to see where I might add color to add to the message of the piece. In "Fall Flight" I knew ahead that I would be using orange and red on the maple leaves and owl's eyes. I added more lines to create the feeling of a burned forest. The final touch was adding the orb, one of my favorite shapes when broken up behind the trees and owl. I guess this part of the process is using both sides of the brain; having emotional response to the piece as well as logically applying additional lines. Do you have an emotional response to this piece?

Fall Flight
9" x 12"
Pen and Ink & Watercolor


I will be sharing my graphic art making at the Oregon Society of Artists in Portland, Oregon on Dec. 1, 2021. This one-day workshop (Black, White and Red All Over) will be fun and relaxing while exercising both sides of your brain!
Hope to see some art making friends--open to all levels of experience. 

Register at https://public.osartists.org/public/workshops or call 503-228-0706.


Saturday, October 16, 2021

A Wrestling Match: Me vs Painting - I Think I Won


Six months ago I was painting egrets using a particular technique, starting with a spray from the mouth atomizer. 


One I named Spirit Egret, and thought enough of it to enter it into a competition. Recently my art friend, Liz Walker, visited and took a look at the painting. She made a remark something like, "I think this has potential, why don't you finish it." Finish it!!  Yikes! I'd already put it under the eyes of a scrutinizing juror!

But of course as I looked at it, I realized it was missing something, mainly color harmony and unity. I spent last week in the wrestling match of trying to make it better, if not great. Stubbornness is my middle name. Instead of telling you each change I made in the process, I'm presenting a slide show. At the end, let me know if you think I can raise my paintbrush as the winner!

Spirit Egret when I thought I was done


With a little warmth added in the lower part of the painting and completing the halo and putting collage on the top egret

Finally letting go of the golden egret idea and turning the halo into a sun while adding one more warm spray over the entire painting after protecting the birds.


The final touch, collage the edge of the sun. Patterns are my thing!

Spirit Egret
22 x 30
Mixed Media

Did I win?

Tuesday, October 5, 2021

Changes and Growth--A Painting 11 Years in the Making

It's been a year now since our home burned to the ground. A new house is being built, and my old art and website need a revival. It will be a few months, but my studio will move out of the barn into a new studio. Part of this process is sorting through my flat files, looking at what's worth moving, what might be edited, and sadly, what needs to just go. During this process, I occasionally see a painting I still like, but could be better. Consequently, this fall leaves painting from 2010 has been given a new life.


A really cool thing about blogging, is that I can look way back in my art creating to revisit how and why I painted this in the first place. https://margaretgodfreyart.blogspot.com/2010/ I enjoyed looking at this old post and, in a sense, revisiting the day I found these leaves and brought them into the studio. This painting represented who I was as an artist in 2010, but I've learned a few tricks, developed a sharper eye, and have become a better critic.

So what is wrong with this piece? Perhaps nothing, but I think it is hard for the viewer to really connect with the painting. Maybe there is just too much activity, especially on a 22" x 30" piece.

What I decided to do was to frame the areas of most interest. To do that, I started with containing two areas that I would develop into more interesting leaf and negative shapes.


Using my mouth atomizer, I darkened the uncovered area with a mix of browns.


Next, I painted two brown frames around the squares I had protected from the brown spray. Already I think you can see it is more interesting.


Finishing of this piece was applying black outlining--something I've become a big fan of. For this I used a black watercolor paint and a brush which sometimes created small rough edges that I left, just because I liked them! Not only are the leaf shapes prominent now, but I also outlined small interesting negative shapes. So here is the painting, 11 years in the making.

Blemished Leaves
22" x 30"
Mixed Media


Sunday, September 19, 2021

While She Sat in a Drawer Things Got Worse

Every once in a while an older painting comes out of a drawer to reach maturity. My daughter has been helping me build a current inventory of my artwork. As we go through the flat files, she will ask, "What's wrong with this one?" or "Doesn't this go with your ______ series?" So the other day I pulled out this early picture that truly was the beginning of my "Teach Me" series. I had really liked creating it, but it got no appreciation from a critique group, so it landed in a drawer where it has been lying since 2018. 

In 2018 the idea was simply a girl reaching out for a book.
She wanted to learn. (Ignore the odd shadow at the bottom.)


Because it was the start of the "Teach Me" series I brought it to the table to see how I could make more of a story out of it. I had always thought of her as an Afghan child flying across the desert. In 2018 Afghanistan was listed as one of the top ten countries most difficult for girls to get an education and now the future looks even darker. How could I convey that more clearly?


I started imagining a landscape. At first I thought I would make the sky a night sky, but that took away the impact of the flying child, so I settled on a light sky with clouds carrying symbols of an education. I already had symbols in the desert, so turning those collaged pieces into clouds was easy. Last night, as I finished creating a landscape in the lower portion, and white clouds in the sky, it seemed awfully cheerful to me. This morning brought a new twist to the painting. I brought in dark, ominous clouds into the sky, representing the returning power of the Taliban. Now there is a story!

Teach Me-Afghanistan


Tuesday, August 31, 2021

From Birds to Museums with a Simple Tool

 If you are an artist, you realize there are many ways to apply paint to a surface besides using a brush. If you are a home owner/fixer-upper, you know that too: rollers, spray paint, sponges, air brushes, etc. Well recently I've been using a small simple tool to apply paint in a way that delivers colors in a misty way that creates a delicate texture for a background. With patience (letting the paint dry) you can layer one color over another, or darken an area with multiple layers. The tool?

A mouth atomizer: Originally I bought a cheap one which broke after a few uses, so I invested in the Pat Dew's Mouth Atomizer and have had it for many years.


Maybe you have one stuck in a drawer, used it once or twice, but didn't stick with it. If so, pull it out and give it a try again. That's what I did a few months ago when I began focusing on birds. I've been enjoying the results. 

This was made with two spray sessions over a large masked area.

It does take some practice to gain good control of one's spraying, and you have to have a good amount of air in your lungs. It also requires some space that can allow for a bit of watercolor mess and is wind-free. I've started mouth atomizing in the garage. This method also requires some masking and covering of space where the paint is not wanted. 

Nothing fancy here, just freezer paper, paper towels and tape. For larger masked areas, or detailed areas, I use Oramask masking film 813.

I will continue to paint birds, but I had this image in my mind that would be a wonderful way to experiment using this method for an interior subject. Several years ago I was in a museum (I'm embarrassed that I can't tell you where) and I took a photo of a couple. He was sitting under an Alexander Calder mobile and she was talking to him from a standing position. There was just so much space, and they were rather miniature in that setting. The scene was full of shadows and lighting and a simplicity that inspired me to take a photo. That moment was the inspiration for this painting.

The idea was simmering in my brain for years, and using the mouth atomizer was the tool I needed to feel I was ready to tackle this painting.


I started with placing the blue masking film on the white paper protecting the pieces of the mobile, the figures and three paintings on the wall. I used the mouth atomizer from that point on; protecting certain areas, spraying more here and there to create the turn of the room, the great golden light coming in the hallway, and the viewing bench. To create the light behind the man with a softer edge, I used a very fine rice paper, dampened the edge of the shape I wanted, and gently tore the paper leaving a ragged edge. Using the same method of protecting certain areas, I implied the floor and other minor details of the space.
render

Once I got to the point of really loving the effects I had created, it was pretty nerve racking to peel off the masked areas and paint what was left. Although the people are small, a good rendering was imperative. Also, I had to paint straight tiny lines to connect the parts of the mobile. Then there were the shadows! All of these small parts were make it or break it items. I am a pretty good fixer, but fixing a mouth atomized piece is nigh impossible.


Last night I was pretty darn proud of myself. I hadn't screwed it up with a water drip, or a crooked line, or an awkward figure. But this morning, I started seeing some problems. They were minor, but I called up my good art buddy, Ruth Armitage, asking for advice for the finishing touches. She took to her iPad and showed me some minor improvements using the app Procreate. I followed her advice and made the following changes--I darkened the lower left corner and some of the floor and put a hit of gray on the white mobile parts. 

Under the Shadow of Calder (working title)

Now I can sit back and think of the story this might tell:

-I've seen enough, Honey!
-Because of the Pandemic, only two people are allowed in the museum at one time.
-My feet are killing me.
-I told you it was Modern Art--Mona Lisa is in another museum.

And on it goes. What story to do see? I'd love to hear your interpretation of the painting!


Sunday, August 15, 2021

Failure Can Be "the Mother of Invention"


We are just three weeks from the one year anniversary of our home burning down in the Holiday Farm Fire. Daily trips to "Godfrey Acres" has allowed us to watch the slow, but predictable renewal of nature's greenery. First signs of returning life were songbirds and ferns. It's amazing to see the burned root clumps of a fern sprout new growth.

And after the usual spring volunteering weeds, ivy, and maples came some amazing colors. In the dry heat, petunias started popping up all over. And then I spied an unexpected snap dragon.


And so as I began to add birds to my graphic art this winter, I am now adding flowers that have shown up on the property. Not only on our property, but up and down the entire burned region, sunflowers are not only growing, but thriving.


So now to the title of this post Failure Can Be "the Mother of Invention."


This week I included my first flower to my graphic art and was pretty pleased with the results. The sunflower set in the burned bark conveys a cheerful, more hopeful image of our current state. I wanted to continue with this new addition to my graphic pieces. 


So I chose to put the incredibly determined petunias into my art. (They are labeled as annuals, but the seeds apparently like the challenge of procreation.) I was excited to add the lovely fuchsia colors to my black and white art.


I began with creating a protected area for the leaves and blooms using the blue film as I often do. I then moved on to drawing and patterning the bark of trees in the background of my bunch of flowers. 

After I was done with the graphic work I peeled off the film and saw that the film had roughed up a bit of the paper's surface. But I forged ahead anyway, figuring that it wouldn't matter once painted. I was wrong! The paint did not go on in the smooth way watercolor should and the paint was not as vivid as I had hoped. So as is my want as a stubborn person, I began to think of ways to solve this failure.


I could paint over the vegetation with acrylics. I could try collaging vivid flowers into the painted area. Neither of those ideas seemed to connect with me. In my frustration, I took scissors to the piece and just cut off the bottom. Now what? Again in stubbornness, I refused to give up on the work I'd already invested in, so I had a new idea. I glued black and white upper part onto a piece of black gessoed paper. Viola!! I now had a path to finishing this art.


I would collage flowers and leaves into the black. In a way, it talks more about the reality of seeing these amazing colors arise out of the soot and ashes the fire left behind, than a simply painted flower does. So where I had failed in a part of this creation I came up with a solution. For anyone who thinks cutting, planning and gluing is easy or fast, it isn't. I could have started an entirely new piece and finished it in about a third of the time it took me to think of and apply a solution to the failed piece. Did I mention that I have a stubborn streak?


To end this post,  Good News on the rebuild front. We have broken ground on our house to come!


As always, I'd love to hear your thoughts about my art, or my blog, or whatever!